|
|
Female Warrior Leather ArmorArmor for the softer sex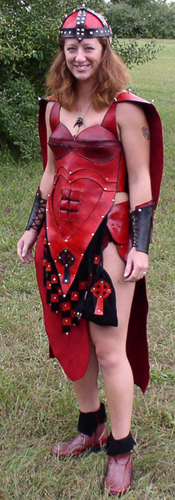 Two weeks before the rennaisance festival my wife decided she wanted to be a warrior this year... Well, we got to work right away. The hardest thing was planning this costume, putting it together was not that difficult.
I knew I wanted to do a layered look with leather atop leather, and I wanted the armor to atleast look muscular, however I was unsure how to handle the various curves. I decided to emulate an orange peel. If you cut an orange into wedges you can lay each wedge flat, but also curve it and put it up against another wedge to form a half circle. This is how I made the breast armor. I decided to run a strip of leather through the center of the breasts horizontally for a couple reasons. 1. it made the attachment of the two wedges easier, and 2. it allowed me a central support to pull on when I fastened the strap in back. It worked out well and I recommend this approach. The breast armor was thicker veg tan, 6 oz maybe, because I had some of that available and it needed to be stiff to offer support (and to stay in position). The rest was very thin vegtan, 2 or 3 oz. We used a thick pigskin split for the cape, it was 6 oz I think so it fell pretty straight down her back, it didn't wave in the wind very much. The helm was made using a variation on the "quick hat/helm" project on this site and the black parts were 6 oz veg tan, the red parts were 2-3oz veg tan. Standard dyes were used, the cross on the cape was made with black dye, not paint or ink. The black suede of the skirt was a thin suede so it did wave around quite a bit. The red under-skirt was of the same material as the cape, so it also didn't blow around or up. We wanted it to be kinda risque so we left her legs mostly bare and then made those thigh guards which simply attached to the belt via belt loops. They worked very well. The cape attached to the shoulder armor via the spikes. The spikes were standard screw-in leather spikes and we could unscrew them to remove or attach the cape. The back of the torso armor was laced up. The mid-breast strip went back by itself and was laced, and then there were two more wider leather strips pulling the stomach area of the torso armor back. We wanted the stitching to be visible and so we used a loop stitch for almost everything. We added many accessories to the armor. The matching wrist guards were made by simply creating appropriately sized leather shapes and adding lacing holes and a little decoration. The pouches were made with left over scrap and match as well. The boots we could have made but we didn't have time so we looked for a simple red pair (eventually finding one at Payless for $12) which we then stiched black suede scrap to the top of. We went through 2 and a half bottles of red dye with this project, so if you're using a color plan ahead. This article was written by Staff Writer. |
|